
DevSecOps practices are essential for maintaining secure and robust software development pipelines. This document outlines best practices for repository scanning, focusing on two main workflows: periodic full repository scans and pull request-based scans.
Key Objectives of Repository Scanning
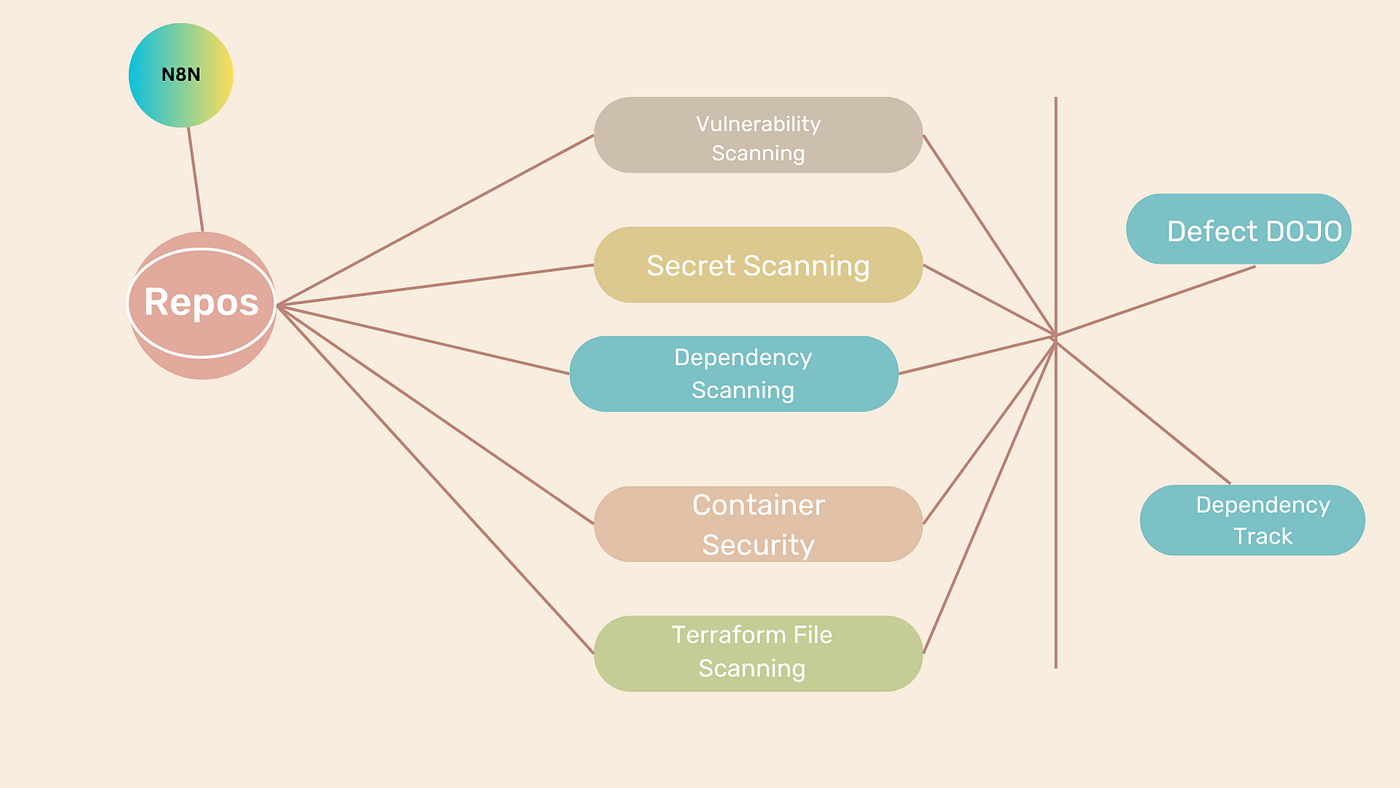
All Repository Scanning Workflow
Use all these tools to scan the repositories and store the output and files.
Here, I am attaching the workflow diagram for reference.
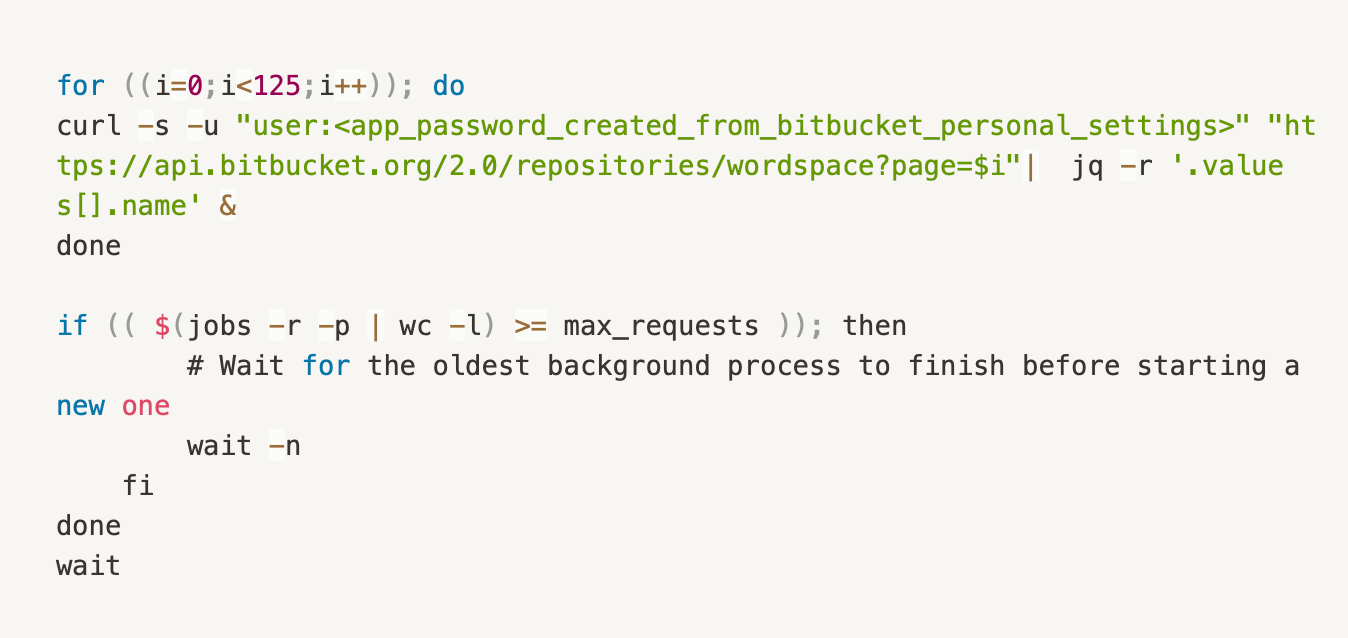
Clone All Repositories
This is how you can clone easily dynamically all the repo name from bitbucket
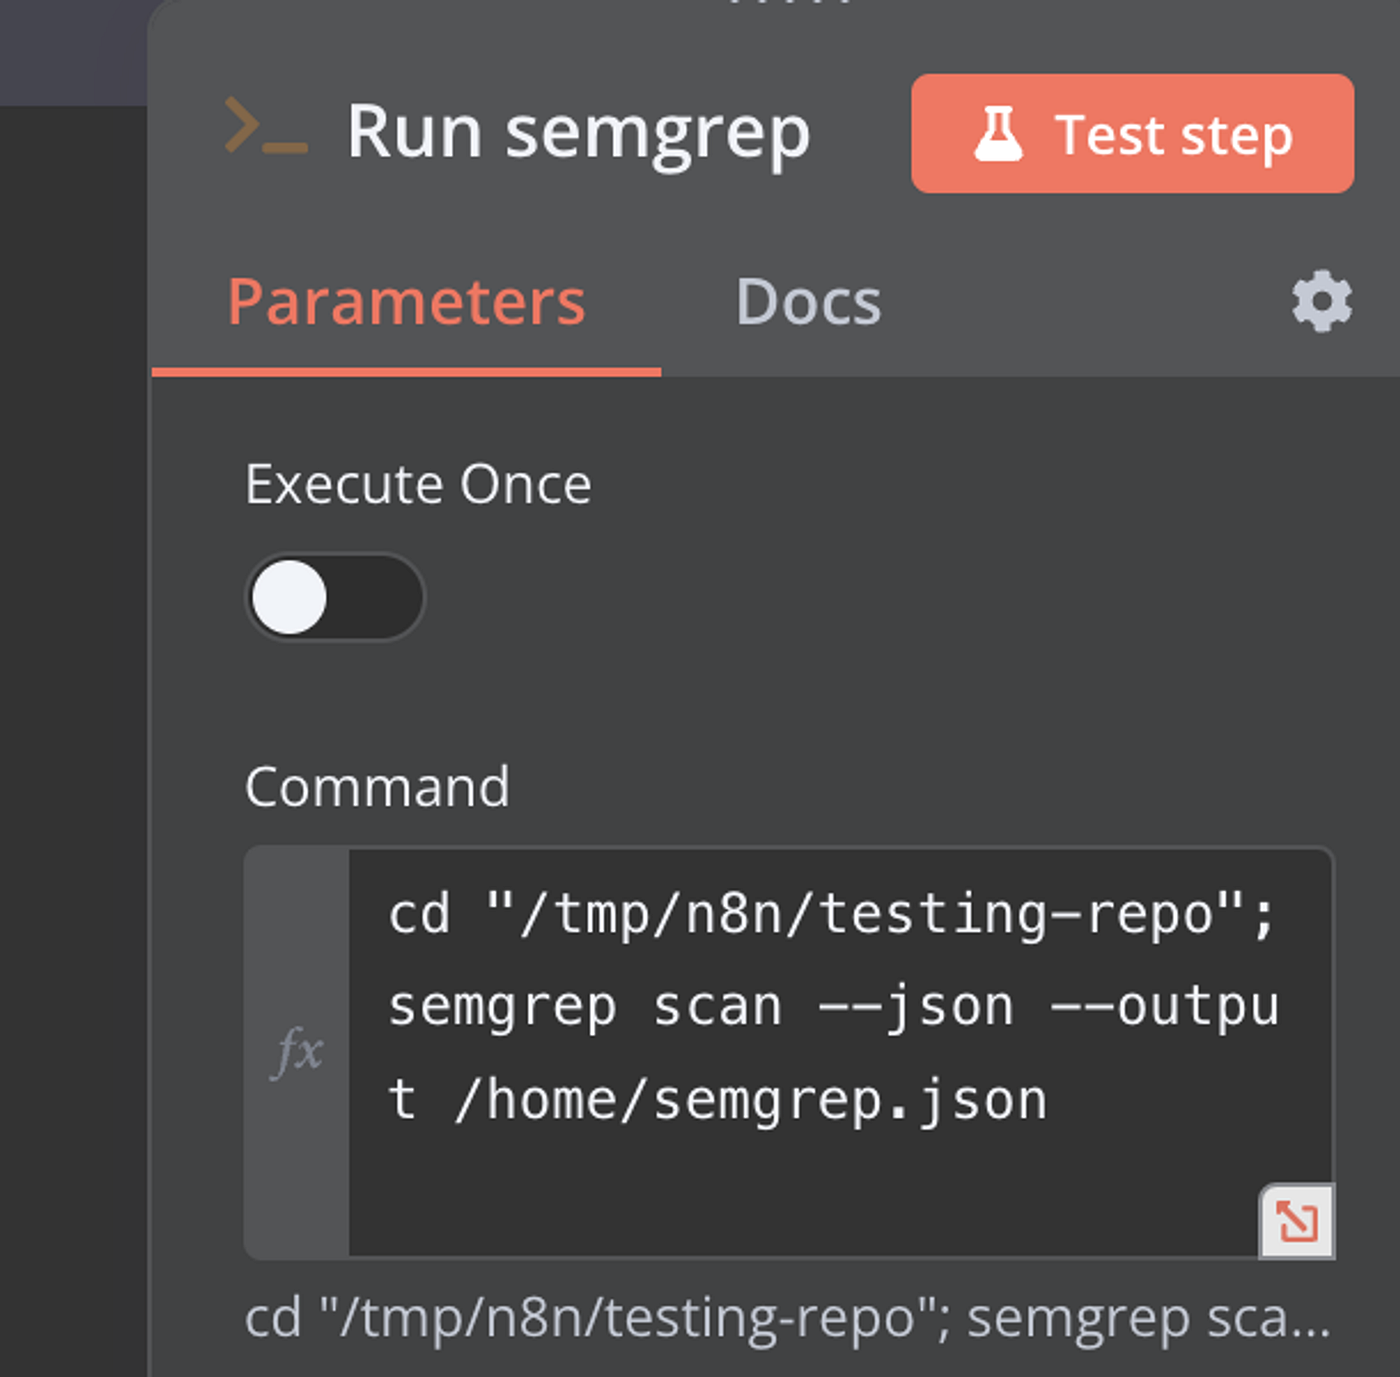
2. Semgrep
- Semgrep will detect all Insecure Configurations, Dangerous Functions, Dangerous Patterns, Interesting Keywords from the source code.
- Run this command in the folder:
semgrep scan --json --output /home/<repo_name_random_hex>_semgrep.json
- Now you will get all the findings of Semgrep.
3. Gitleaks
- Run Gitleaks in the same repository.
- Before running Gitleaks, remove uninteresting secrets from gitleaks.toml.
- You may increase the entropy if you face many false positives.
gitleaks detect . -v -r /home/repo_gitleaks_random_hex.json -f json --no-color --no-banner --exit-code 0 --config /home/gitleaks_config.toml 2>&1
4. CDXGen
- Run CDXGen to go through all dependency files and generate an SBOM file.
- You can send these SBOM files to Dependency Tracker to scan them.
- It will provide information if any dependencies have CVEs or are vulnerable.
cdxgen -o bom.json
- To push all repositories into Dependency Track, host Dependency Track somewhere, generate an API key in Dependency Track.
cdxgen -r --server-url http://<url>:8080 --api-key <xxxxxxxxxxxx>
- Now, whatever CDXGen generates will be pushed into Dependency Track.
5. Trivy
- Use Trivy to find vulnerabilities and IaC misconfigurations, SBOM discovery, Cloud scanning, Kubernetes security risks, and more.
trivy fs . --scanners vuln,misconfiguration -f json -o /home/trivy.json
6. DefectDojo
- DefectDojo provides reporting at every level including tests, engagements, and products. DefectDojo offers a variety of metrics to gain visibility into vulnerability trends and insights within your organization
- Steps to follow for integrating into our workflow
- Deploy DefectDojo somewhere in your VM or K8s cluster.
- Create a product, product type, and engagement.
- Generate an API key.
- Using that API key with DefectDojo documentation, you can easily push all the findings into DefectDojo.
- DefectDojo supports Trivy, Gitleaks, and Semgrep report formats, so you can directly pass the files generated by these tools to DefectDojo.
- This is the script:

All set. Now we will place all our commands and code into n8n as shown below.
The good thing about n8n is that it supports webhooks, Git nodes, Slack nodes, JavaScript, Python code, schedule nodes, and more.
However, the downside is that it is a workflow tool, so it only runs one task at a time and does not support multithreading, as far as I know. Additionally, it cannot determine which node triggered the current node.
Once we push all the data into DefectDojo, this is how it looks:

Great, our first workflow is ready. From here, we can monitor our repositories for vulnerabilities, secrets, dependencies, and so on. We can address and fix any issues as soon as possible.
Streamlining PR Scanning for Secrets with Open Source Tools
When a secret gets exposed, it not only poses a risk of potential harm but also highlights weaknesses in the organization’s security practices and culture. The key problem is that once a secret is pushed to a remote version control system like Bitbucket, it becomes permanent. There’s no foolproof way to erase a secret from Bitbucket once it’s been uploaded, apart from a method I’ll explain later, which isn’t perfect either.
False positives can be a significant problem because secrets can appear in many different formats, making it challenging to identify them accurately. This is why it’s important to handle the scanning process in a flexible manner. By allowing us to customize the scanner settings for each repository individually or even disable it when necessary, we can better manage and reduce false positives. This modular approach ensures that our scanning process remains effective and accurate.
Here’s a comprehensive guide on setting up this system
Step-by-Step Guide
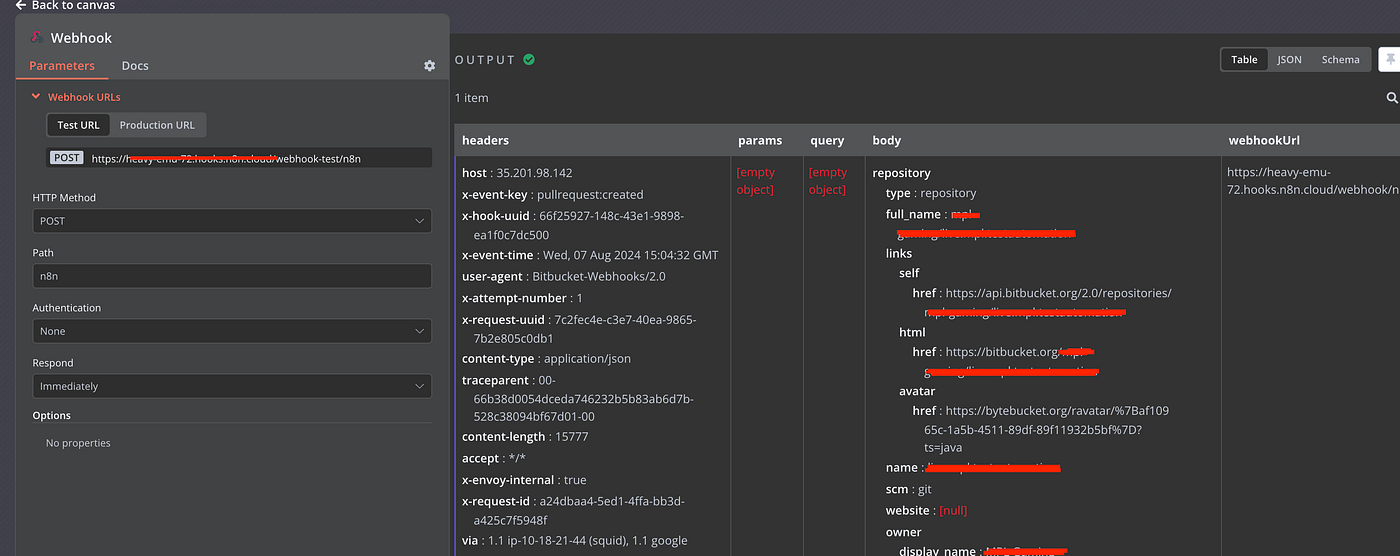
1. Adding Webhooks in Bitbucket
First, you need to add a webhook to Bitbucket. When adding a webhook, select “Pull Request” as the scope. This ensures the webhook is triggered whenever a developer raises a PR.
For example, n8n supports webhooks, and adding a production-ready webhook in n8n will allow it to listen for webhooks indefinitely once the workflow is activated.
2. Handling Webhook Triggers and Cloning
When the webhook is triggered, it provides information like the pull request, repository, workspace, PR ID, etc. Using this information, clone the exact repository.
Instead of scanning the entire repository, focus on the changes to be merged from the specific branch. Clone the repo and checkout the branch, so only that specific branch is scanned.
git clone [[email protected]](<mailto:[email protected]>):example/InternalRepo /tmp/n8n/InternalRepo-424c4f55fe94-d02044 -b fix/criticalbufix
we can see that fix/criticalbufix is the feature branch, by mentioning -b we are just checking out that branch
3. Running Gitleaks on Cloned Repositories
To run Gitleaks, only scan the code diffs in the commits rather than the entire repo. Determine the number of commits to scan using the following parameters:
- Base Branch Commit Hash
- Feature Branch
For example, to calculate the diff between the feature-branch and master branch, use the command:
git diff master..feature-branch
This command outputs all changes made in feature-branch since it diverged from master.
Even if secrets are removed from the PR, they might still exist in the commit history. Therefore, scan the complete commit history (base_branch..new_branch_HEAD) for each commit to the PR, not just the latest commit.
Gitleaks Command
Just get the master commit hash and feature branch, then Gitleaks will start scanning for secrets.
Run Gitleaks to scan the diffs using the following command:
gitleaks detect -source=$(pwd) -log-opts="$master_commit_sha..$branch" -f json -exit-code 0 -report-path=$(pwd)/report -c gitleaks.toml 1> /dev/null
Explanation:
- log-opts: Instructs Gitleaks to scan all commits from base_sha to branch.
- exit-code 0: Prevents job failure if secrets are detected (we handle job failure based on our needs).
- report-path: Saves the output to a file named ‘report’.
- c (or -config): Specifies the Gitleaks configuration file (regex file for detection). We use a different configuration file (stored in an S3 bucket) for each repository to support custom configurations and control false positives.
Handling Secrets Found
We configured Gitleaks to always return exit-code 0. To detect if a secret was found, check the size of the report file. If no secrets are found (empty report), the job can be safely exited.
We configured Gitleaks to always return exit-code 0, So how do we know if a secret was found?
There are multiple ways to check if it did, what I did, is to simply check the size of the report file.
When no secrets were found (empty report), I quit the job with SUCCESS status:
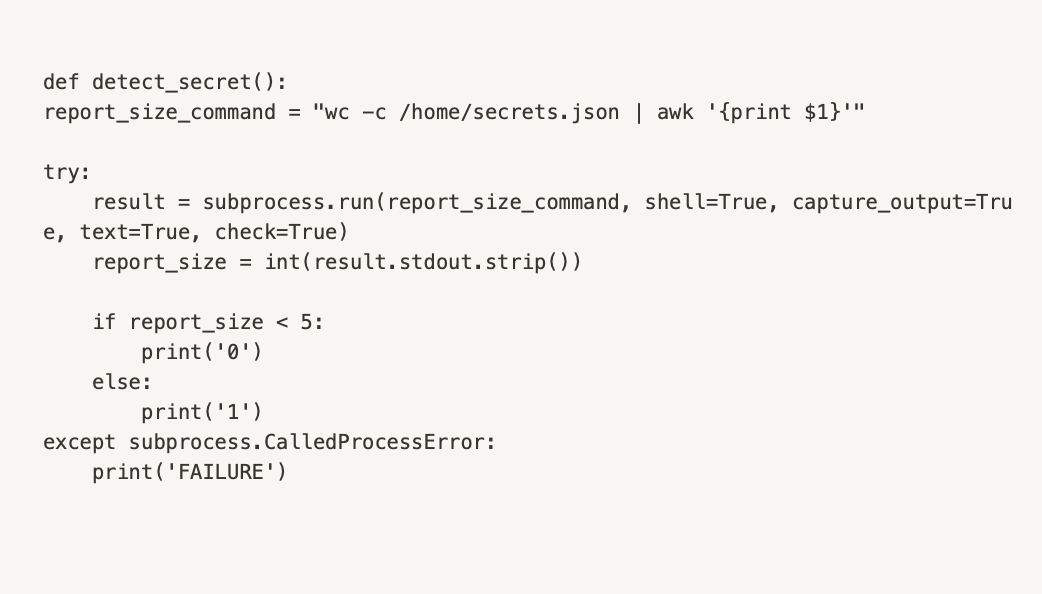
If a ‘1’ is returned, it means a secret was found in the commits. Then, continue with the next steps.
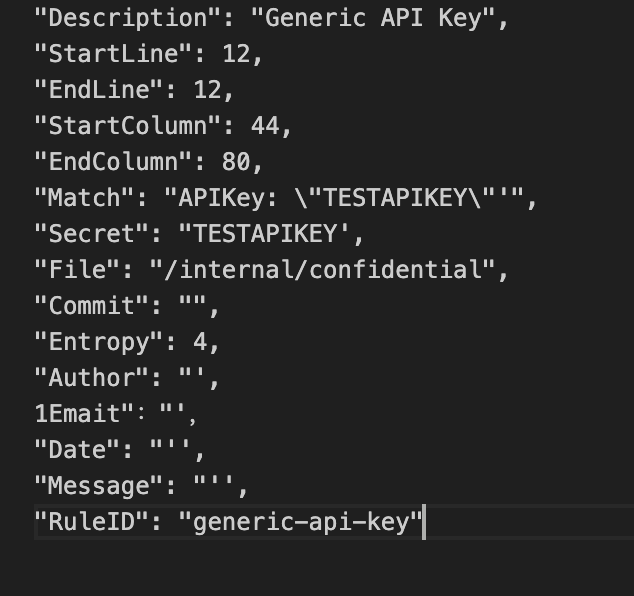
After detecting secrets, you can take a look at the secret file, which will look like below:
Write a Python script to parse the report and format it as needed. Bitbucket offers API calls to comment on PRs. Use that API to comment out the exact line where the secret was found:
https://api.bitbucket.org/2.0/repositories/example/"+ repository +"/pullrequests/"+ prID +"/comments"
Comment like this:

By fetching the exact line from the Gitleaks report and constructing a URL, developers can click the URL and be directed to the exact line containing the secret.
Declining the PR
Use the following API call to decline the PR:
[https://api.bitbucket.org/2.0/repositories/<repo>/](<https://api.bitbucket.org/2.0/repositories/<repo>/>)"+ repository +"/pullrequests/"+ prID +"/decline
Notification
This is how we are notified if secrets are found or not.

Here’s my workflow in n8n:
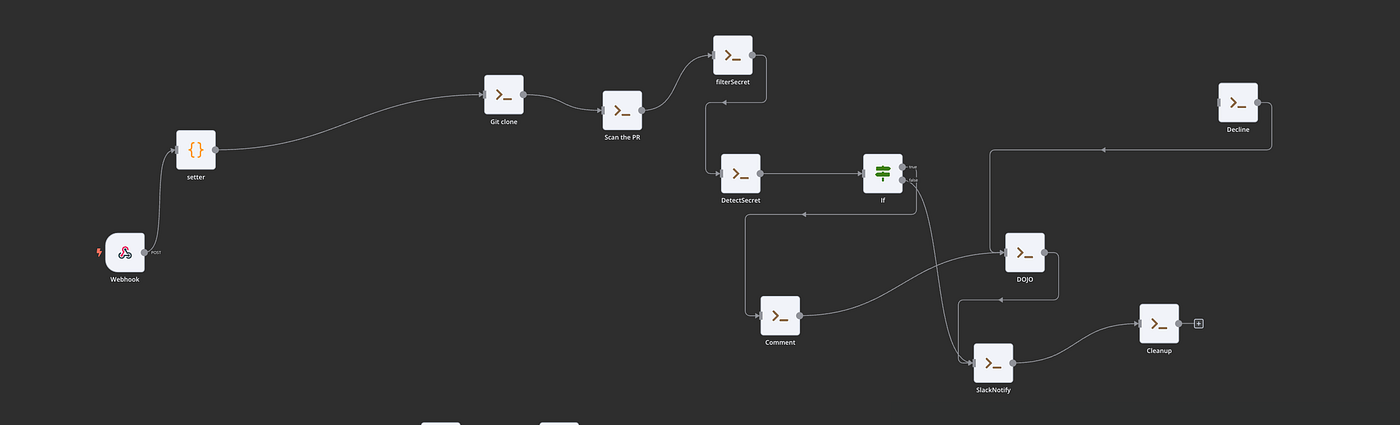
This is how we can scan all the PR’s and scan for secret and decline and comment
Conclusion
By setting up a webhook to trigger a N8N on each commit to a PR and scanning the code diffs, we cover the essentials of secret scanning. Additionally, we support custom configurations by creating dedicated config files for each repository, ensuring our scanning process is both effective and accurate.